Set Up a Canva Tri-Fold Brochure That Prints Correctly
To make a Canva tri-fold brochure, choose a tri-fold template sized for US Letter paper (8.5 by 11 inches). Replace the sample text and images, then check all six panels before printing: the outside spread holds the inside flap, back cover, and front cover from left to right. The inside spread reads left to right. Keep text away from the folds, and download a PDF Print file with bleed and crop marks for your printer.
A template makes the design faster, but a paper proof helps you catch a misplaced panel or hard-to-read text before you order copies.
I'm Jessica Gutowski-Slaydon, president of Swift Printing in Grand Rapids. I draw on years of hands-on brochure and print-production work to help customers turn a Canva tri fold brochure into a piece that looks right when it's folded.
Anatomy and Panel Order of a Canva Tri Fold Brochure
Setting up a multi-panel document requires an understanding of how flat paper folds into a handheld piece. When designing a folded brochure, you are working with two distinct sides of a flat sheet of paper: the outside spread and the inside spread. Each side is divided into three equal sections, creating six functional panels.
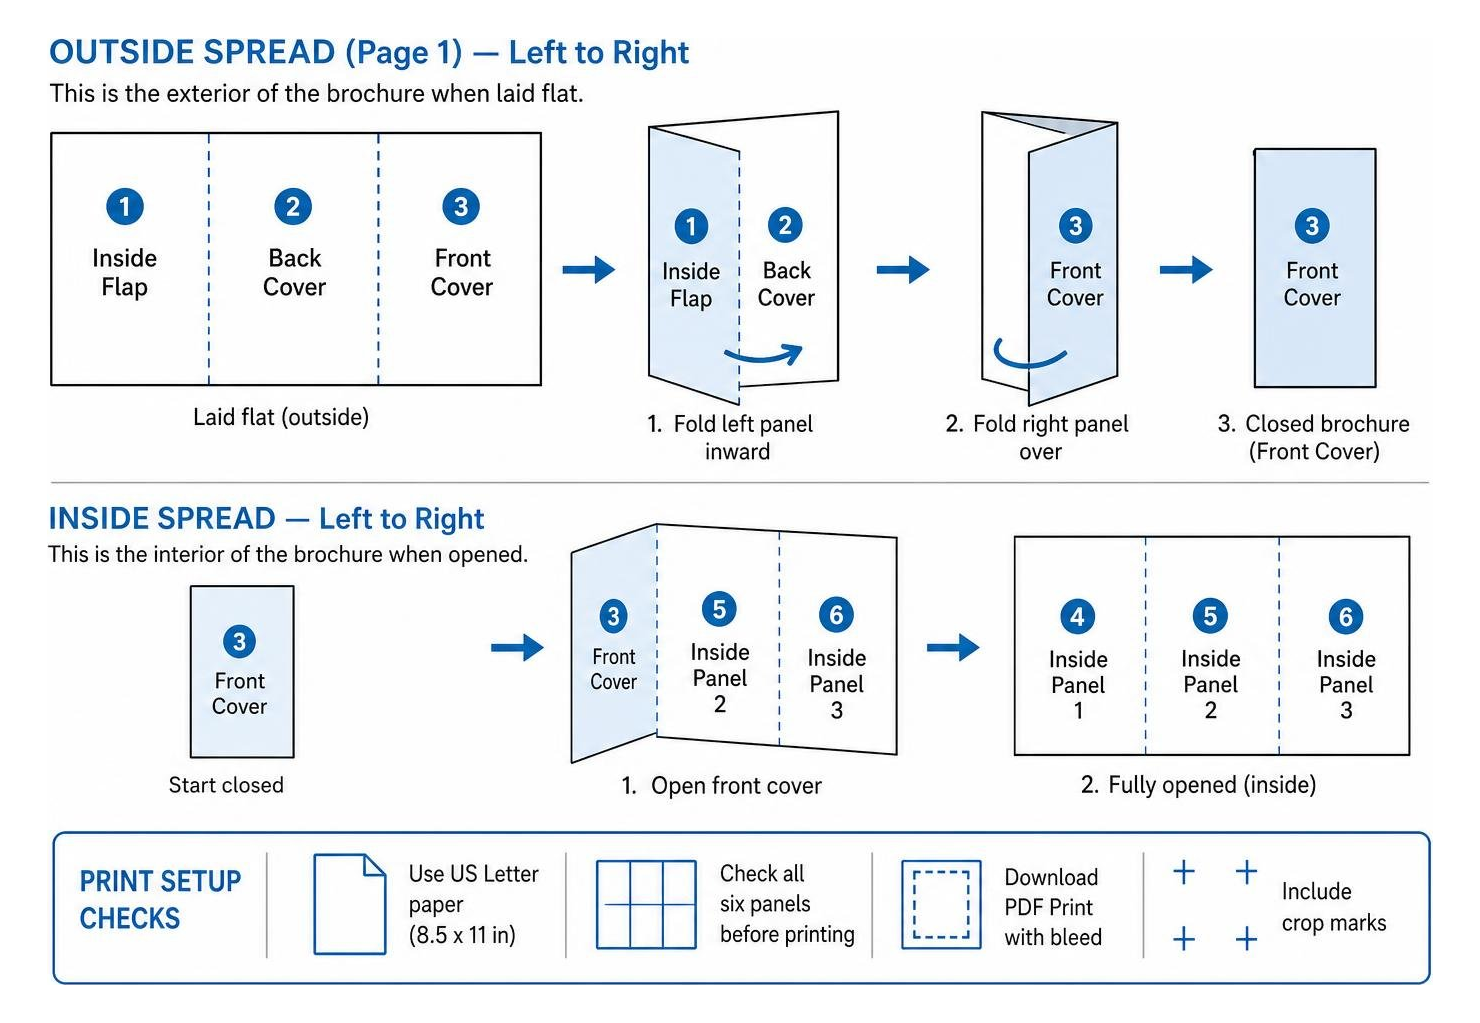
Because a tri-fold tucks one panel inward beneath the front cover, the sequence in which your reader interacts with the material differs from standard book page numbering. Learning how to create a trifold brochure means planning how content reveals itself step by step as the reader opens each fold.
Outside Spread: Mapping the Front Cover, Back, and Flap of Your Canva Tri Fold Brochure
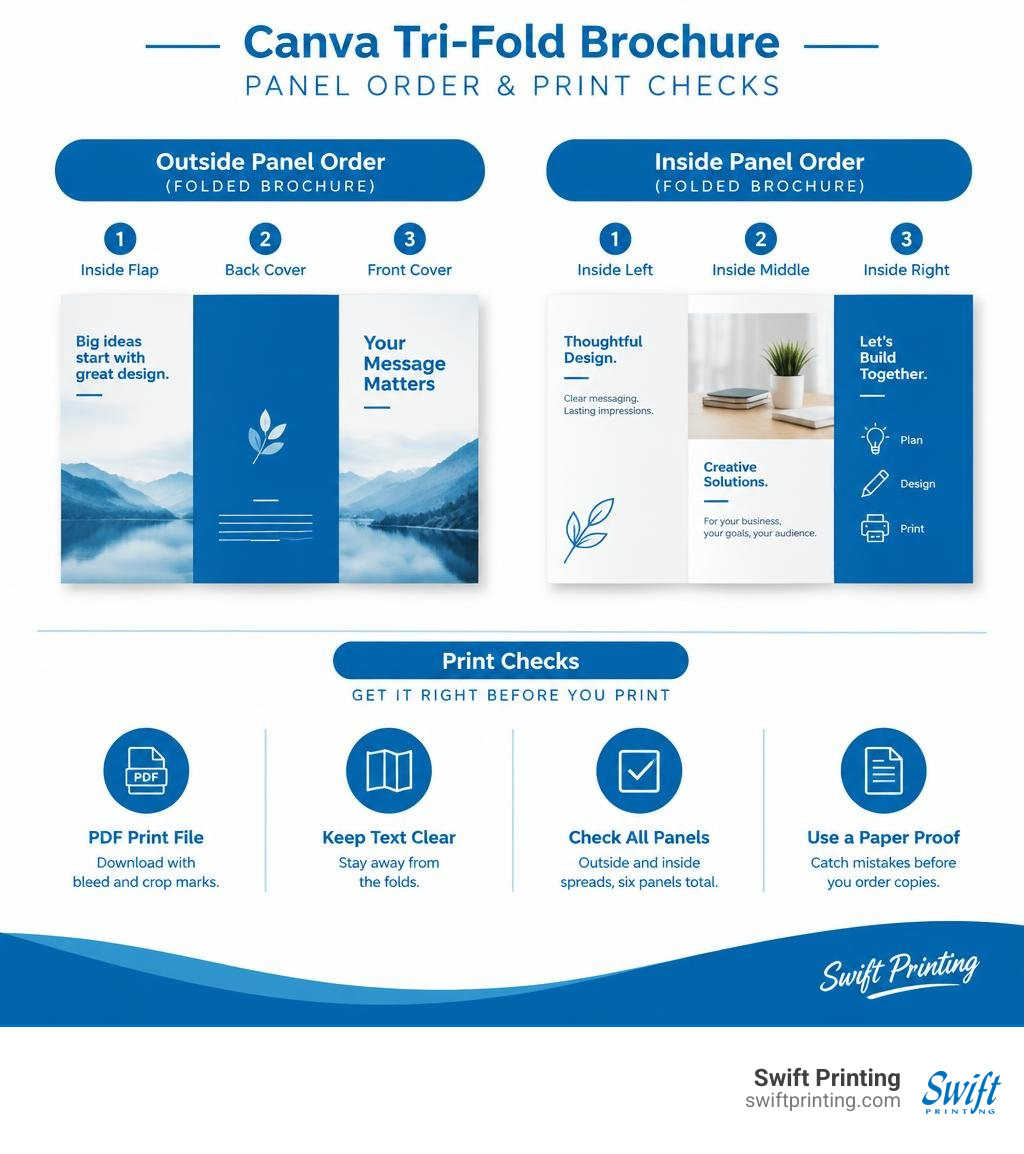
When you look at Page 1 in your design workspace, you are viewing the exterior of the brochure laid completely flat. Arranging these panels in the proper sequence ensures your reader encounters your message in the intended order:
- Left Panel (Inside Flap / Tuck-in Panel): This panel folds directly underneath the front cover. It is the very first panel a reader sees when lifting the front cover open. It works best for an introduction, key service highlights, or an engaging summary of your organization's mission.
- Middle Panel (Back Cover): This section forms the exterior back of the folded piece. Place closing information here, such as direct office phone lines, office locations, appointment booking links, accreditations, and required legal disclosures.
- Right Panel (Front Cover): This is the outward-facing front of your piece when fully folded. It needs your primary headline, logo, concise value proposition, and an eye-catching, high-resolution visual.
| Panel Position | Panel Name | Reader Journey | Layout Priorities |
|---|---|---|---|
| Outside Left | Inside Flap | First reveal upon opening | Engaging secondary hook, executive summary, key benefits |
| Outside Middle | Back Cover | Final takeaway / Reference | Office locations, contact information, credentials, website |
| Outside Right | Front Cover | Initial impression | Primary headline, corporate logo, high-impact brand visual |
| Inside Left | Interior Left | Beginning of full narrative | Core service details, practice areas, background narrative |
| Inside Middle | Interior Center | Core focal point | Detailed capabilities, process workflow, client case highlights |
| Inside Right | Interior Right | Final interior message | Clear call to action, consultation instructions, next steps |
Inside Spread: Structuring the Three Interior Panels of Your Canva Tri Fold Brochure
Page 2 of your layout represents the interior spread. When the recipient unfolds the piece entirely, all three interior panels appear simultaneously side by side:
- Inside Left Panel: Sets up the core details of your services, medical practice specialties, or legal practice areas.
- Inside Center Panel: Acts as the primary anchor for deep-dive information, technical capabilities, process overviews, or staff credentials.
- Inside Right Panel: Concludes the internal presentation with a clear call to action, next steps for booking an initial consultation, or steps to start an engagement.
Designing the inside as a unified 3-panel spread creates a spacious, cohesive presentation that keeps the reader engaged across all three sections.
How to Set Up and Customize Your Tri-Fold Brochure in Canva Step-by-Step
Creating a clean, accurate layout requires proper document settings, consistent brand assets, and structured content margins.
Step 1: Choosing Dimensions and Templates
Begin by navigating to Canva and setting up your canvas dimensions. For standard commercial printing in North America, choose standard US Letter (8.5 by 11 inches) in landscape orientation. Check Canva's brochure sizes guide to confirm dimension standards.
If you are starting from a blank canvas or exploring pre-built layouts, use Canva AI 2.0 to search for layouts tailored to your industry, such as healthcare, legal services, management consulting, or public agencies. You can also explore expert layout strategies in our guide on how to design the perfect brochure for your Grand Rapids business.
- Click Create a design in the upper corner.
- Select Custom size, change the unit dropdown to inches, and enter 11 for width and 8.5 for height.
- Turn on your digital guides by going to File > View settings > Show rulers and guides.
- Drag vertical guidelines from the left ruler to mark your fold points at approximately 3.625 inches and 7.313 inches across the canvas.
Step 2: Customizing Brand Assets, Typography, and Imagery
Apply your brand assets consistently across both pages. If your organization maintains a Canva Brand Kit, apply your established brand color palette, vector logos, and designated corporate typefaces across every panel.
For professional practices, replace generic stock graphics with authentic, high-resolution photography of your actual facilities, partners, or clinical team. If you want to refine your organization's core visual assets, walk through this exercise on using Canva for business branding.
Step 3: Organizing Content Flow and White Space
Maintain ample breathing room around your text blocks so the document remains easy to read. Dense paragraphs without adequate spacing overwhelm readers. Learn how to make a trifold brochure that gets results by using clear headings, subheadings, bullet lists, and generous white space to make complex information quick to scan.
Best Design Practices for Professional Tri-Fold Layouts
A polished corporate piece relies on deliberate visual hierarchy, sharp image resolution, and proper fold allowances.
Typography, Imagery, and Color Palette Selection
Professional layouts maintain clarity through disciplined design choices:
- Limit Font Families: Restrict your layout to two complementary typefaces—one clean serif or sans-serif for main titles and a highly legible neutral sans-serif for body paragraphs.
- High-Resolution Photography: Confirm that all uploaded raster images are at least 300 DPI at full print size to prevent blurriness or pixelation.
- Color Balance: Use high-contrast color pairings for body copy against solid backgrounds. Review our recommendations on making your printing materials look great to ensure your colors reproduce cleanly.
Common File Setup Mistakes to Avoid
Before finalizing your design, check your panels for common setup errors:
- Text Running Across Folds: Keep body copy at least 0.25 inches away from fold lines. Text placed over a fold looks unpolished and becomes difficult to read.
- Ignoring the Tuck-In Margin: The inside flap must be slightly narrower than the outer panels so it folds flat without buckling. Keep its content centered within its narrower safety margin.
- Missing Gutter Spacing: Maintain uniform margins on both sides of every fold line. For more prepress checks, consult our guide on common print file mistakes to avoid.
Preparing and Exporting Your Canva File for Commercial Printing
Commercial production requires specific export settings to ensure colors, margins, and edges translate accurately to physical paper.
Setting Up Bleed and Crop Marks
Bleed refers to extending your background imagery or solid colors 0.125 inches beyond the final trim edge of the document. When our automated cutters trim your finished pieces down to size, this extra printed area prevents thin, unintended white slivers along the paper edges. Learn more about why crop and bleed marks matter during production.
In Canva, turn on bleed visualization by clicking File > View settings > Show print bleed. Ensure all edge-to-edge backgrounds stretch completely to this outer dashed line.
Exporting Print-Ready PDF Files
Follow these steps to export a commercial-grade file:
- Click the Share button in the upper right corner and select Download.
- Under File type, choose PDF Print.
- Check the box for Crop marks and bleed.
- Check the box for Flatten PDF to ensure all graphic layers, typography vectors, and transparency elements render properly on press.
- If using Canva Pro, select the CMYK (best for professional print) color profile.
- Click Download to save the final PDF file to your computer.
For more details on preparing artwork, review our walkthrough on how to prepare a Canva file for the printer.
Frequently Asked Questions About Tri-Fold Brochures
Can I design a professional tri-fold brochure using Canva's free plan?
Yes. Canva's free plan provides access to thousands of brochure templates, typography pairing tools, and basic graphic elements. However, upgrading to Canva Pro adds advanced features such as the Brand Kit, custom font uploads, an expanded library of premium photography, and direct CMYK PDF Print exports for commercial workflows.
What is the standard size for printing a tri-fold brochure?
In North America, the industry standard is 8.5 by 11 inches (US Letter) folded into three sections. Other standard variations include 8.5 by 14 inches (Legal) and 11 by 17 inches (Tabloid) for image-heavy or technical presentations. Across international markets, the standard format is A4 (210 by 297 mm).
How do I prevent text from getting cut off in the brochure folds?
Set up safety margins of at least 0.25 to 0.375 inches away from all outer edges and internal fold guidelines. Keeping all critical headlines, copy blocks, and logos within these safe zones prevents elements from shifting into the mechanical folds. For more file prep specifications, check our guide on what format to send your artwork to the commercial printer.
Conclusion
A well-executed tri-fold brochure remains one of the most effective, tangible tools for establishing authority, explaining detailed services, and guiding prospective clients toward a consultation. By setting up your panels in the correct sequence, preserving safety margins around your folds, and exporting a high-resolution PDF Print file with bleed and crop marks, you give your organization a polished, professional edge.
At Swift Printing, we are a high-end print shop setting the standard for printing in the boutique business. We take pride in delivering precise folds, vibrant color reproduction, and heavy paper stocks that elevate your brand. If you are preparing collateral for your practice or corporate office in Grand Rapids or anywhere across West Michigan, contact our team to bring your design into print.