How to Design and Print QR Code Stickers That Actually Scan
Why Your QR Code Sticker Either Gets Scanned — or Gets Ignored

A QR code sticker is one of the simplest ways to connect something physical — a package, a window, a business card — directly to your digital world. Here's what you need to know at a glance:
What a QR code sticker does:
- Encodes a URL, Wi-Fi password, contact card, or other data into a scannable pattern
- Works with any modern iPhone or Android camera — no app needed
- Comes in two types: static (permanent, never expires) and dynamic (editable after printing, with scan tracking)
- Stays scannable even with up to 30% damage, thanks to built-in error correction
To print a QR code sticker that actually scans, you need:
- High contrast between the code and its background (dark on light)
- A minimum size of 2 cm × 2 cm (about 0.8 inches square)
- A clear white border (quiet zone) around the code
- The right material for your environment — vinyl for outdoors, paper for short-term indoor use
- A print-ready file in SVG or high-resolution PNG format
The problem most people run into isn't creating the QR code — it's everything that happens between the screen and the finished sticker. A code that looks perfect on your monitor can fail completely in print if the contrast is off, the size is too small, or the material reflects glare into a phone camera.
I'm Jessica Gutowski-Slaydon, president of Swift Printing in Grand Rapids, Michigan, and our team has helped countless local businesses and nonprofits produce QR code stickers that hold up in the real world — on packaging, storefronts, and everything in between. In this guide, I'll walk you through exactly what makes the difference between a sticker that gets scanned and one that gets ignored.
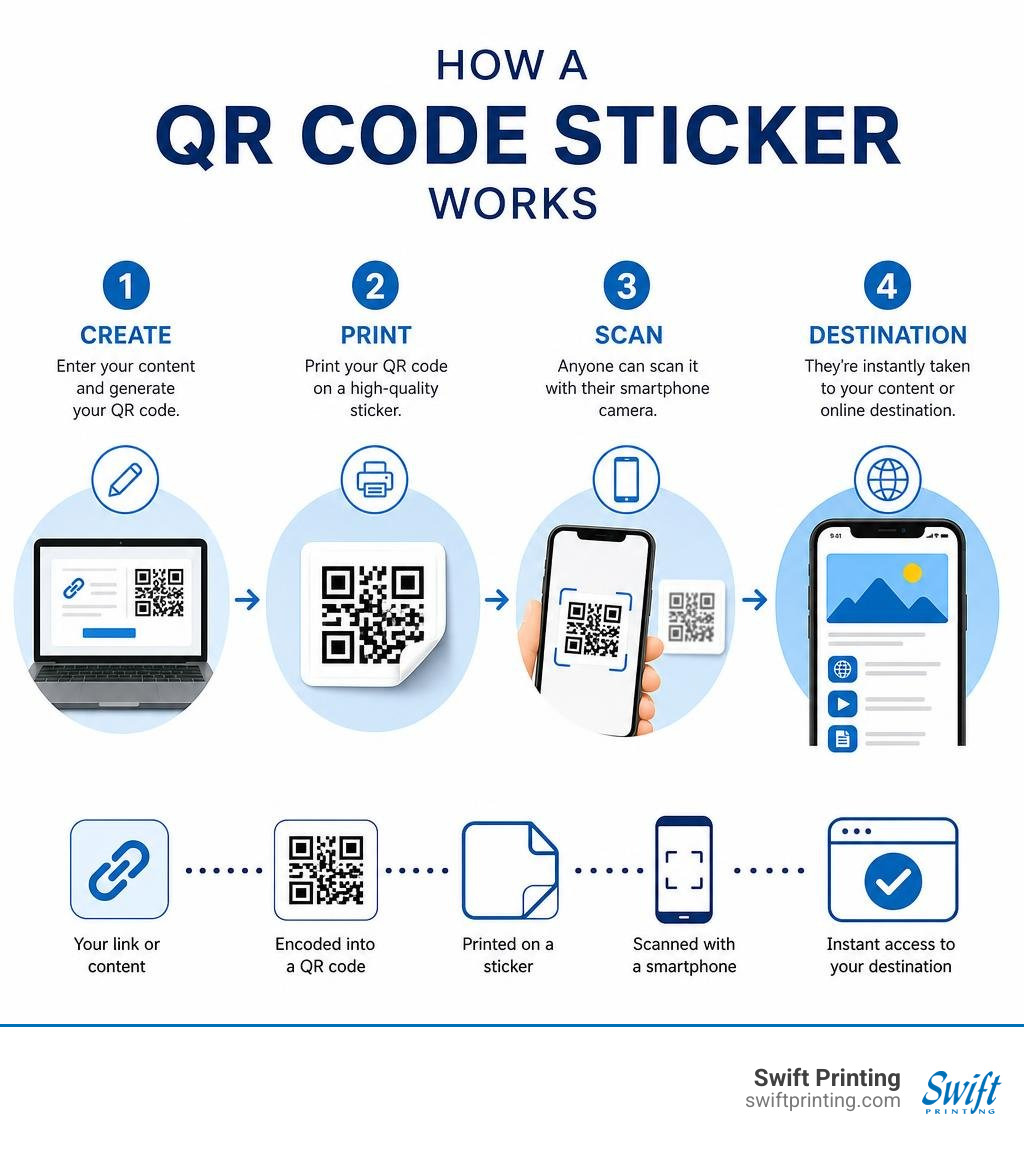
What Is a QR Code Sticker and How Does It Work?
A qr code sticker is a physical adhesive label printed with a Quick Response (QR) code matrix. At its core, a QR code is a two-dimensional barcode that stores digital data in a grid of dark squares on a light background. Standardized internationally under ISO 18004, QR codes are engineered for rapid reading by digital image sensors.
When a smartphone user opens their native camera app and points it at a qr code sticker, the camera's image processor looks for three distinct square alignment structures located at the top-left, top-right, and bottom-left corners of the code. These structural anchor points—known as position detection patterns or finder patterns—tell the camera software how the sticker is oriented, even if it is scanned sideways or at an angle.
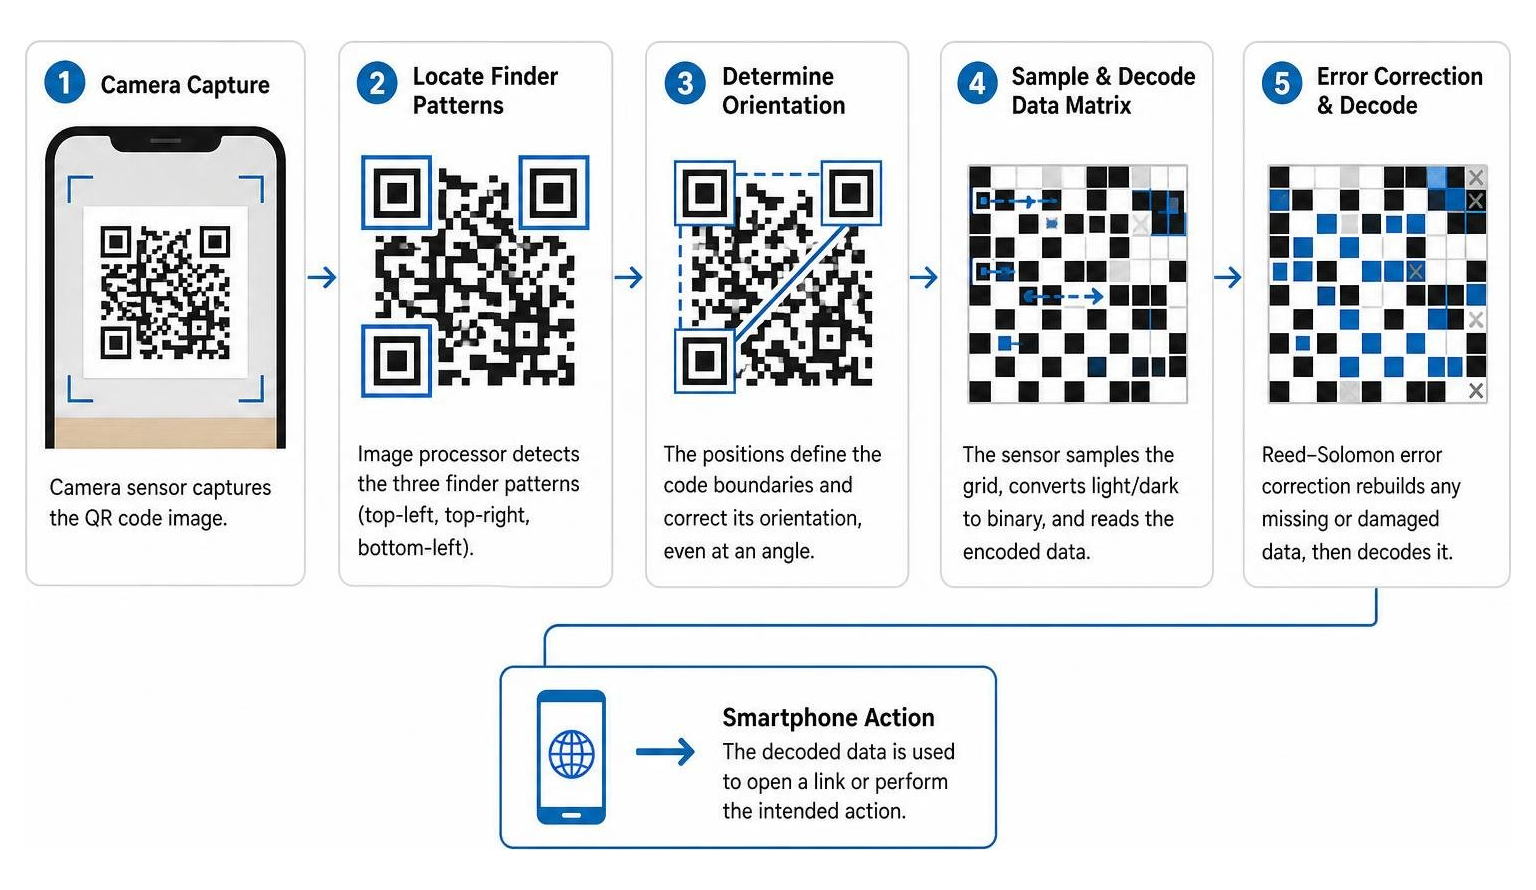
Inside the pixel grid, data is encoded as binary bits (zeros and ones). Beyond storing the actual web address or text string, QR codes contain sophisticated Reed-Solomon error correction algorithms. This mathematically redundant data restoration system enables a code to remain fully readable even if portions of the physical sticker surface are scratched, smudged, torn, or wet.
Depending on the configuration selected during generation, QR code error correction exists in four distinct standardized tiers:
- Level L (Low): Reconstructs up to 7% of lost pattern data.
- Level M (Medium): Reconstructs up to 15% of lost pattern data ( standard default setting).
- Level Q (Quartile): Reconstructs up to 25% of lost pattern data.
- Level H (High): Reconstructs up to 30% of lost pattern data.
For physical printed stickers exposed to handling, weathering, or decorative brand overlays, Level H error correction is the commercial gold standard.
Static vs. Dynamic QR Code Sticker Types
Before committing your design to paper or vinyl, you must decide between two fundamentally different architecture types: static and dynamic codes.
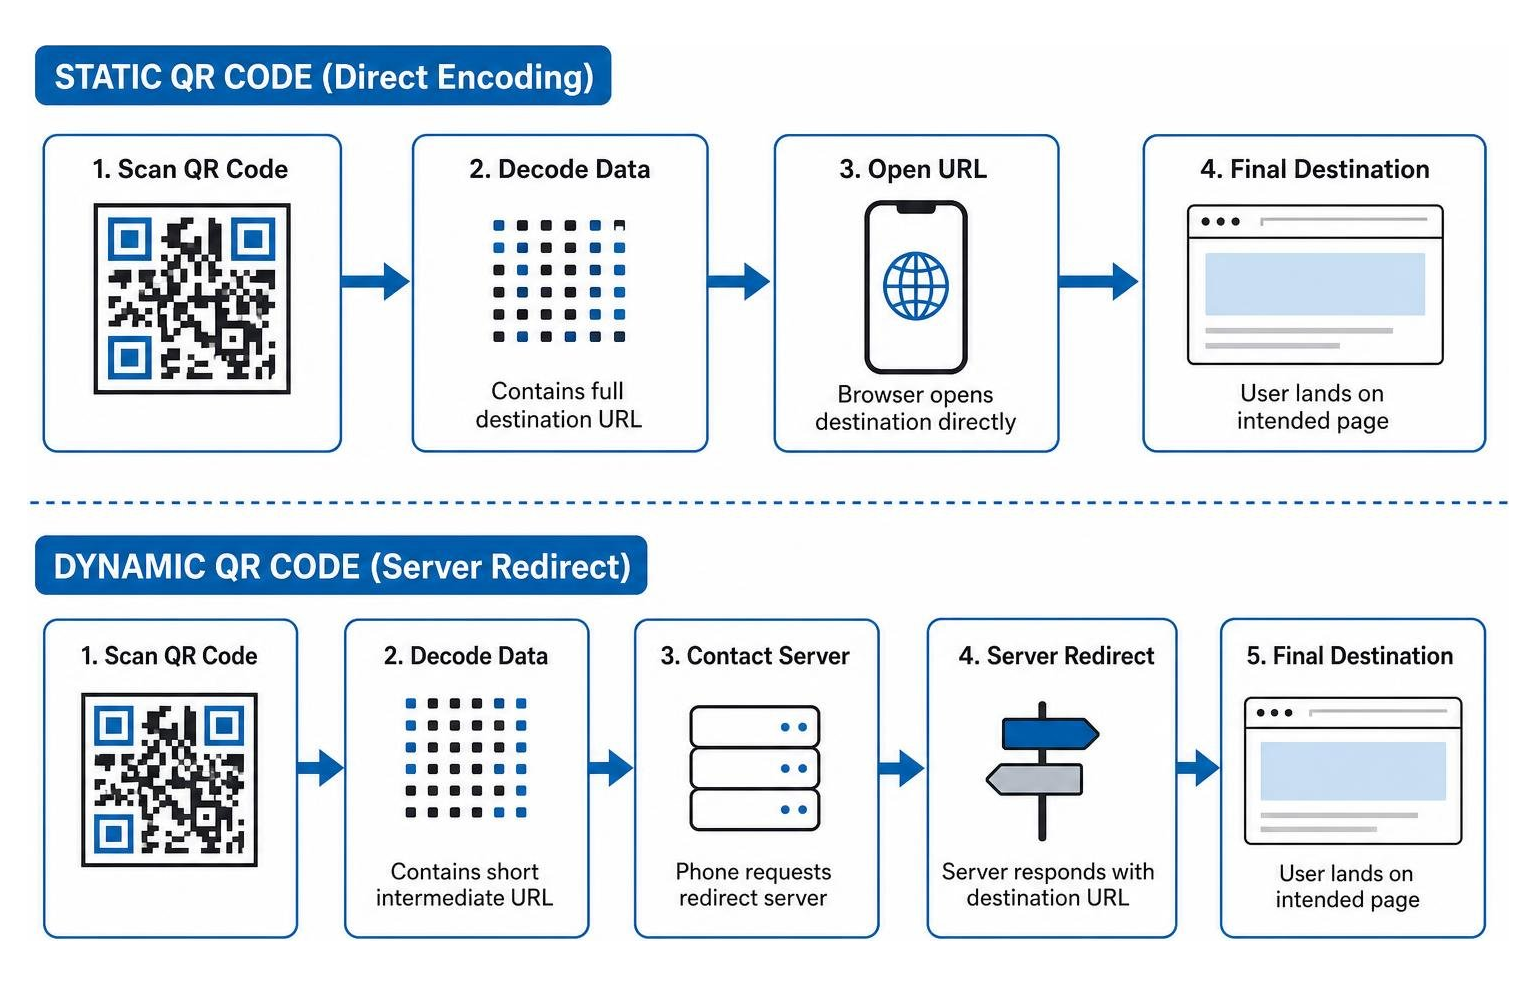
Static QR Code Stickers store the final destination data directly inside the visual matrix pattern. Because the raw data (such as https://www.swiftprinting.com/products) is permanently built into the pixels, static codes operate completely independently without intermediate redirect servers.
- Pros: They never expire, require zero ongoing software subscriptions, operate indefinitely, and offer high browser-level privacy because no analytics servers capture intermediate user traffic. Tools like the Free QR Code Sticker Maker allow you to generate static sheet layouts right in your browser.
- Cons: The encoded URL cannot be edited once printed. If your web address changes, the physical sticker becomes obsolete. Additionally, complex web addresses create denser pixel grids, requiring larger print dimensions to remain scan-safe.
Dynamic QR Code Stickers store a short intermediate server URL rather than the final destination link. When a phone scans the sticker, it contacts the redirect server, which instantly routes the user to your live landing page.
- Pros: You can update the target destination URL at any time without reprinting physical stickers. They retain a cleaner, lower-density pixel matrix regardless of target link length, and they capture campaign analytics (including total scan count, geographic location, device operating system, and scan time). You can learn more about configuring destination links in our guide on how to make a QR code.
- Cons: Dynamic services rely on an active backend host platform (such as paid software subscriptions like QRKIT starting around $16 per month billed annually), and links will stop functioning if the hosting platform account lapses.
Common Commercial and Marketing Use Cases
The demand for scannable labels has surged across every industry. On Pinterest alone, over 2,000 users daily search for creative qr code sticker designs. Physical-to-digital bridges let businesses convert real-world foot traffic into measurable online engagement.
Here are the most effective real-world commercial applications we print for our clients:
- Product Packaging and Seal Labels: Brand owners place custom stickers over box seals, coffee pouches, or cosmetic containers. Scanning directs buyers to digital user manuals, batch authenticity certificates, video tutorials, or instant repeat ordering portals. Discover how packaging accents shape brand perception in our guide on the power of labels and stickers in building a bold, memorable brand.
- Storefront Window and Table Displays: Retail shops and restaurants deploy durable window stickers for 24/7 engagement—linking passersby to online menus, event calendars, or seasonal booking forms.
- Google Review Collection: Placing small review stickers at service checkout counters, on restaurant table tents, or on invoice receipts makes it easy for happy customers to leave feedback on review platforms.
- Guest Wi-Fi Access: Hospitality venues replace complex written passwords with network QR stickers. Guests scan the label to join secure Wi-Fi automatically without manual typing.
- Inventory Management and Asset Tracking: Industrial warehouses apply heavy-duty asset stickers to machinery, IT hardware, and storage bins to instantly bring up equipment service logs or stock levels.
- Business Card and Networking Overlays: Updating contact details on static printed stock can be expensive. Adding a small dynamic vCard sticker ensures your digital contact card stays accurate year after year.
Key Design Principles for Scannable QR Code Stickers
Designing a qr code sticker requires balancing aesthetic branding with optical functionality. Unlike traditional artwork where subtle shifts in tone look beautiful, optical camera sensors require crisp geometric definition.
Sizing Guidelines and the Minimum QR Code Sticker Dimensions
One of the most common mistakes in label design is printing the QR matrix too small. Smartphone camera lenses need adequate spatial resolution to distinguish individual black and white module squares.
- Absolute Minimum Size: For close-range scanning (arm's length scanning on a business card or product tag), the minimum physical matrix size is 2 cm × 2 cm (0.8 in × 0.8 in).
- Recommended Standard Size: For general packaging, retail shelf tags, and small signage, aim for 3 cm × 3 cm to 4 cm × 4 cm (1.2 in to 1.6 in square).
- Distance Ratio Rule: Use the established 1:10 scanning ratio rule. The physical size of the QR code matrix should equal roughly one-tenth of the total distance between the camera lens and the sticker.
| Intended Scanning Environment | Typical Distance | Minimum Recommended QR Matrix Size |
|---|---|---|
| Product Packaging / Business Cards | 8–12 inches (20–30 cm) | 0.8 in × 0.8 in (2 cm × 2 cm) |
| Storefront Counters & Desk Signage | 20–30 inches (50–75 cm) | 1.5 in × 1.5 in (3.8 cm × 3.8 cm) |
| Vehicle Bumper & Window Decals | 3–5 feet (1–1.5 meters) | 4.0 in × 4.0 in (10 cm × 10 cm) |
| Indoor Posters & Trade Show Displays | 6–10 feet (2–3 meters) | 8.0 in × 8.0 in (20 cm × 20 cm) |
Note: Always maintain a safe outer print margin beyond the code's active matrix area to prevent cutting blades from truncating outer data modules during die-cutting operations.
Designing Frames, Color Contrast, and Custom Branding
To maximize scan success rates, follow these strict visual styling guidelines:
- Maintain High Contrast (Dark on Light): Optical sensors read light reflection differences. The standard best practice is high-contrast dark modules (black, deep navy, dark charcoal) on a light background (pure white, cream, soft pastels). Avoid inverted codes (light dots on a dark background); while some modern smartphones read inverted codes, many legacy camera sensors and third-party scanners fail completely.
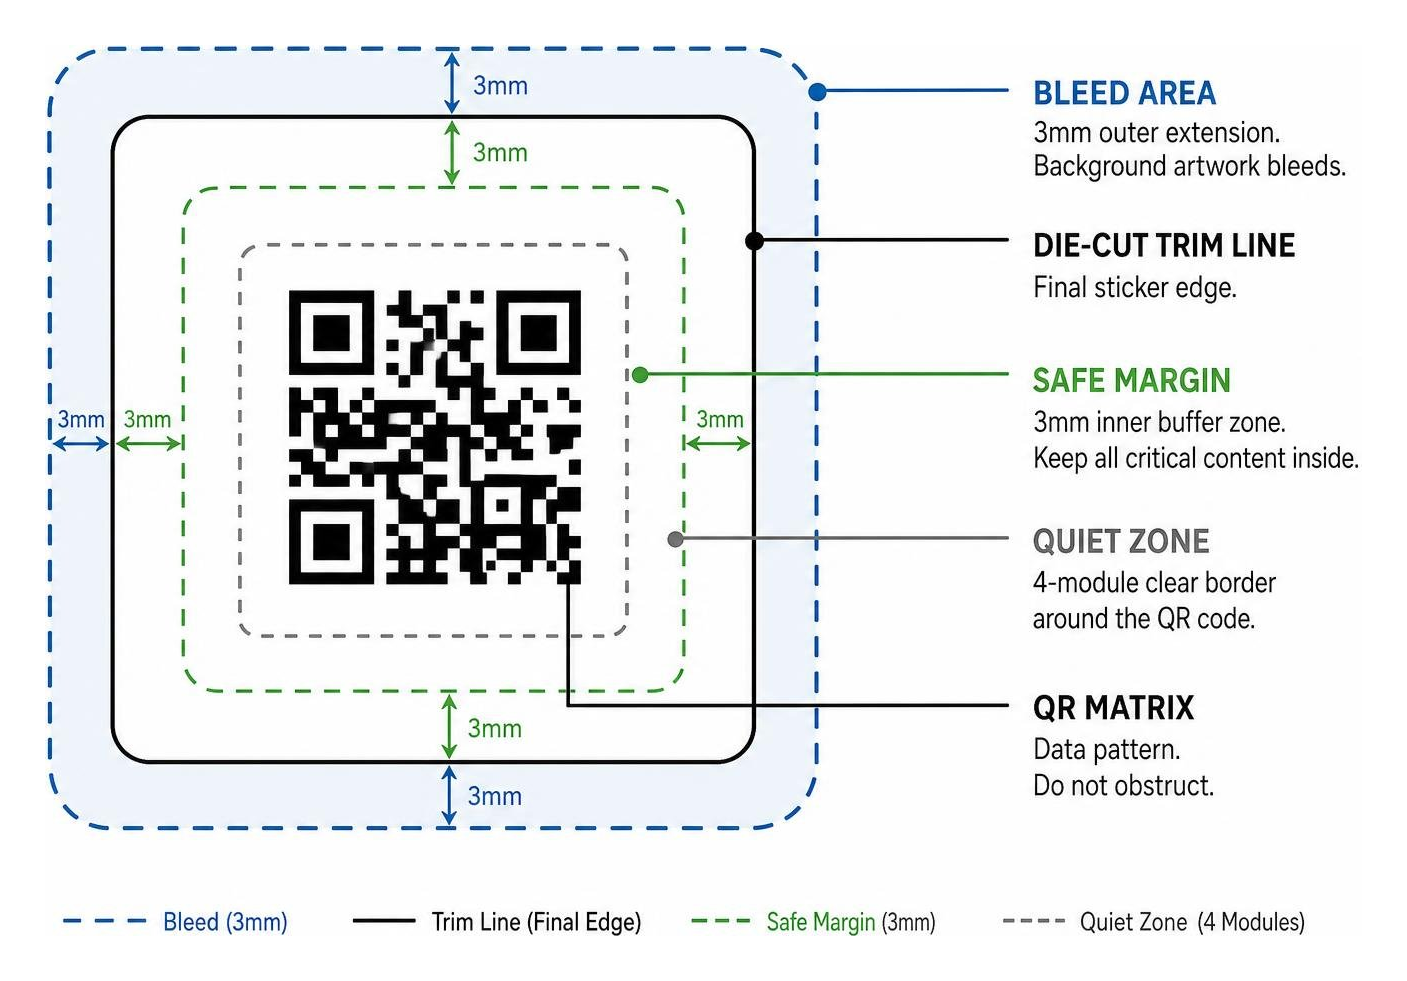
- Enforce the Quiet Zone: Every QR code requires an unobstructed border known as the quiet zone. This margin must be at least 4 modules wide (four times the thickness of a single data dot square) on all four sides. Never allow text, brand graphics, or background patterns to bleed into this clear white perimeter.
- Incorporate Call-to-Action (CTA) Frames: QR code stickers paired with explicit framing text like "Scan for Menu," "Scan to Order," or "Scan Me for 10% Off" achieve significantly higher engagement than plain standalone square codes. Adding visual structure guides customer expectations. For ready-to-use frame designs, explore these sticker-ready QR code templates.
- Logo Overlay Guidelines: Inserting your company logo into the center of a QR code builds brand trust. However, placing artwork over the matrix covers essential data bits. When adding a central logo:
- Set the error correction setting to Level H (30%).
- Ensure the central logo image area does not obscure more than 20–25% of the total matrix area.
- Never overlap or alter the three square finder patterns in the corners.
Selecting the Right Materials and Durable Finishes
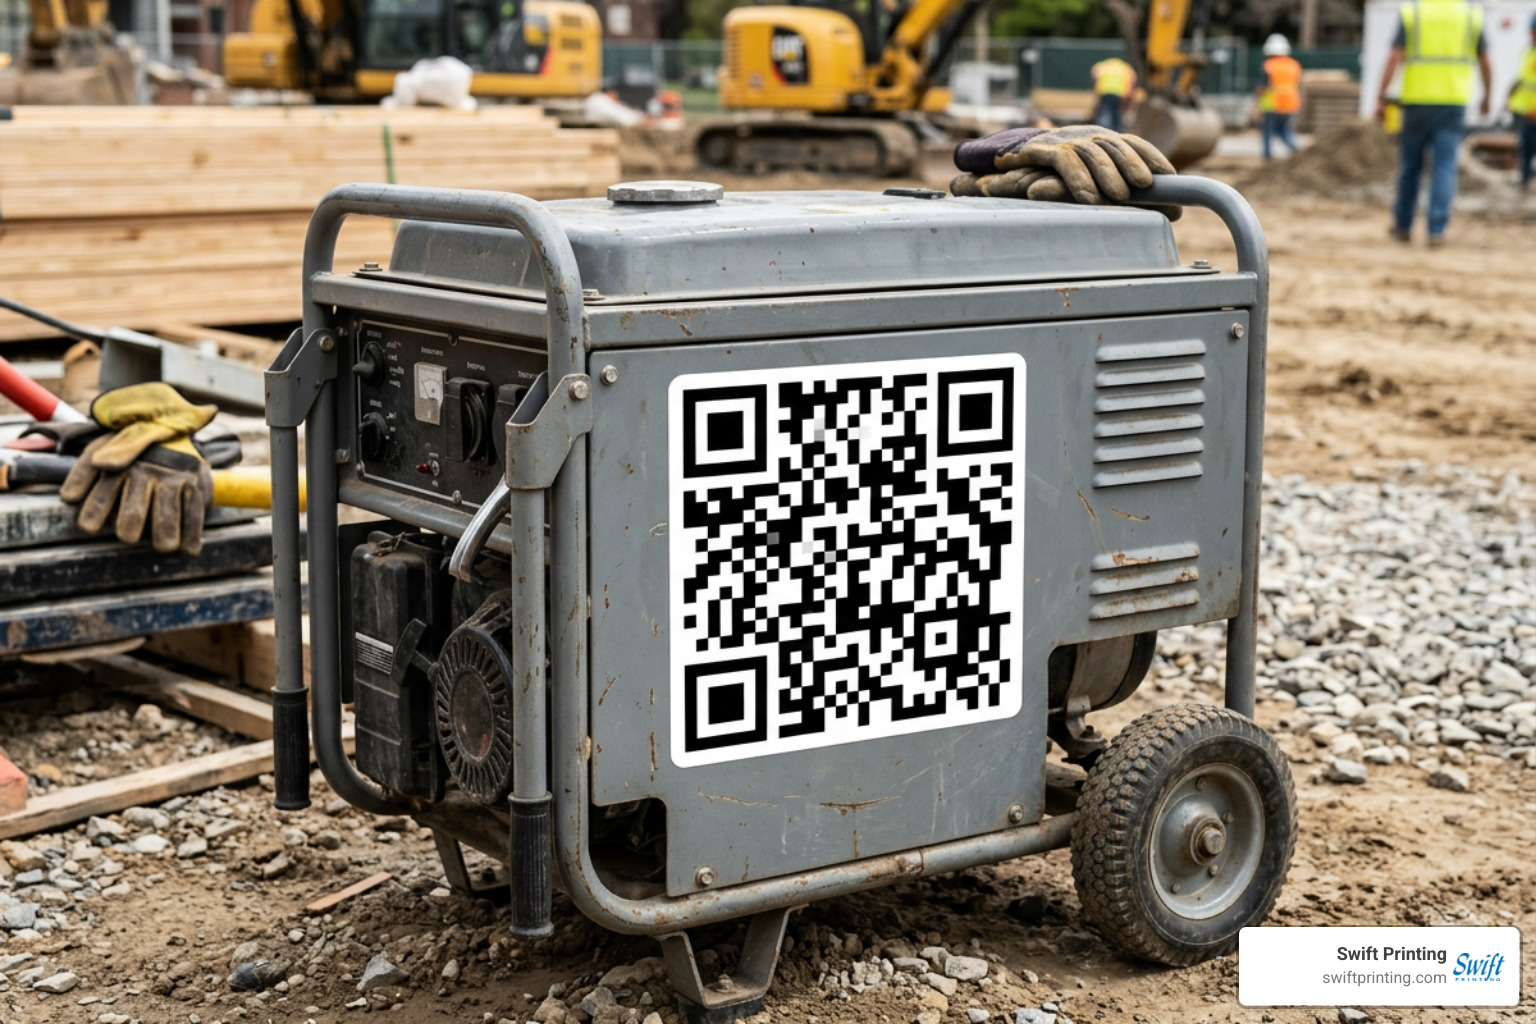
A beautifully formatted graphic will fail if printed on an incompatible substrate. The physical environment where your sticker is deployed dictates the combination of face stock, adhesive backing, and protective topcoats needed.
Material Options for Indoor and Outdoor Use
Choosing the right material ensures long-term readability and protects against premature wear.
- Standard Matte Paper: Ideal for short-term indoor uses such as single-use packaging labels, takeaway coffee cups, or event badges. Paper stock is economical ($0.15–$0.30 per sticker for short home runs), but it absorbs moisture and tears easily under friction.
- Glossy & Matte White Vinyl: Premium white vinyl is the industry standard for outdoor stickers, bumper decals, and long-term asset tags. Vinyl is waterproof, flexible, and resists tearing. White vinyl provides the bright baseline contrast camera sensors need.
- BOPP (Biaxially-Oriented Polypropylene): Excellent for commercial food packaging, cosmetic jars, and bottle labels. Synthetic BOPP film offers high chemical, oil, and moisture resistance.
- Clear / Transparent Stock: Transparent stickers look sleek on glass windows or clear plastic jars. However, clear backgrounds introduce scan risks: if applied over a dark product or patterned surface, camera contrast drops to zero and rendering fails. When printing clear stickers, ensure high opacity by laying down a solid white ink layer directly behind the dark QR module pattern.
- Adhesive Formulations: Select permanent adhesive for retail products, shipping boxes, and tamper-evident packaging. Use removable or static-cling adhesive for temporary promotional window graphics or fleet vehicle glass where easy removal without residue is required.
| Material Substrate | Indoor / Outdoor | Water & Weather Resistance | Recommended Best Use Cases |
|---|---|---|---|
| Uncoated Paper | Indoor Only | Poor | Shipping labels, short-term receipts, disposable packaging |
| Matte White Vinyl | Indoor & Outdoor | Excellent (1–3 years) | Product labels, storefront display decals, equipment tags |
| UV-Laminated Vinyl | Outdoor Heavy-Duty | Superior (3–5+ years) | Fleet vehicles, outdoor machinery, exterior building signage |
| Glossy BOPP Film | Indoor & Moisture-Prone | High | Refrigerated food containers, beverage bottles, cosmetic jars |
| Clear Polypropylene | Indoor & Glass Windows | Moderate to High | Retail window displays, clear jar labels (requires white under-ink) |
Managing Glare and Surface Reflection
Glare is a major cause of scan failures on physical labels. Direct sunlight or overhead fluorescent lights reflecting off glossy surfaces can wash out black pixels and blind phone optical sensors.
- Matte Finish (Strongly Recommended): Choosing a matte lamination or velvet matte finish diffuses ambient light, eliminating reflective hot spots. Phone cameras capture clean contrast from almost any viewing angle under harsh lighting.
- Glossy Finish Precautions: If your brand packaging requires a high-gloss aesthetic, select a larger matrix dimensions (e.g., 4 cm × 4 cm minimum) and use Level H error correction to offset light glare.
- Curved Surface Distortion: Wrapping a square sticker around narrow cylindrical surfaces—such as small bottles, cans, or lip balm tubes—distorts finder pattern geometry. For curved items, print the QR code matrix smaller or orient it vertically along the straight edge of the cylinder to minimize camera distortion.
How to Generate and Print Custom QR Code Stickers
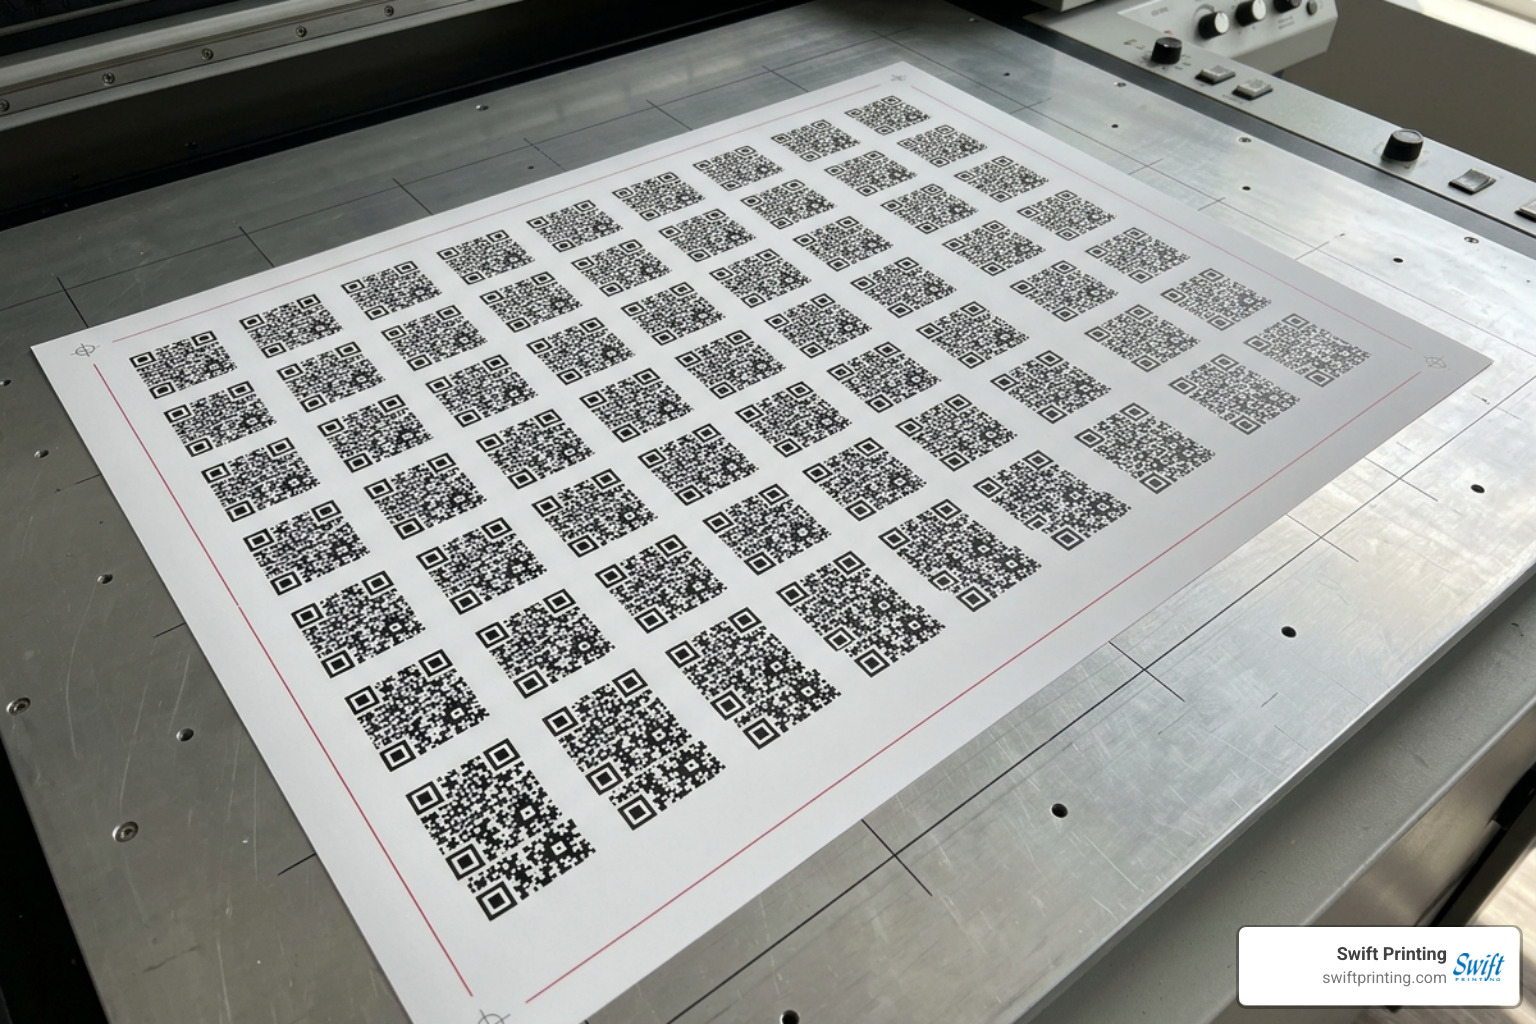
Moving from screen design to finished print sheets requires clean file preparation to ensure sharp physical output.
DIY Desktop Printing vs. Professional Print Services
Depending on your production volume and quality standards, choose between desktop short-run printing and commercial printing:
- DIY At-Home Desktop Printing:
- Best for: Testing concepts, internal organization labels, or small events requiring under 100 stickers.
- Costs: Sheet label stock costs between $0.15 and $0.30 per sticker.
- Limitations: Standard desktop inkjets use water-based inks that bleed when exposed to water or moisture unless covered by clear tape. In addition, hand-cutting sheet labels can leave uneven margins that encroach on quiet zones. Web applications like the Print-Ready SVG generator by QRSprint provide clean, instant vector code downloads suitable for desktop layouts.
- Commercial Print Production:
- Best for: Commercial brand packaging, weather-resistant outdoor stickers, die-cut shapes, and volume orders (from 100 to over 50,000 units).
- Costs: Prices range from $0.93 to $5.00 per sticker for small runs, dropping significantly on larger commercial production runs.
- Advantages: Commercial print vendors use high-resolution digital presses, fade-resistant UV-curable inks, automated precision die-cutting machinery, and commercial matte coatings. Explore our professional capabilities on our dedicated label printing service page.
File Preparation and Bleed Settings
When sending custom artwork files to commercial printers, file formatting is crucial:
- Always Export in Vector SVG Format: Vector files maintain infinite resolution scale without pixelation. If you must use raster files (PNG or JPEG), ensure the artwork resolution is exported at 300 DPI (dots per inch) or higher at full physical print dimensions. Never upscale low-resolution web graphics.
- Color Space Conversion (RGB to CMYK): Computer monitors present graphics in RGB (Red, Green, Blue) light space, whereas commercial printing presses use CMYK (Cyan, Magenta, Yellow, Key Black) physical ink pigments. Convert your files to CMYK before proofing to ensure dark background colors don't shift into muddy dark grey tones that reduce optical contrast.
- Include 3mm Print Bleed and Safe Margins:
- Bleed: Extend background artwork and frame graphics 3 mm (0.125 inches) beyond the final trimmed sticker edge.
- Safe Area Zone: Keep the interactive QR matrix and its quiet zone inside a safe margin at least 3 mm inside the planned cut line. This buffer protects your code if cut position tolerances shift slightly during high-speed mechanical finishing.
- Bulk File Preparation: If printing unique serialization codes or asset tags across large sheets, set up structured CSV data sheets containing variable target destinations and unique asset serial numbers to streamline dynamic batch printing.
Frequently Asked Questions About QR Code Stickers
Can I update the content of my sticker after it is printed?
Yes—provided you use a dynamic QR code. Dynamic codes route scans through a central intermediate server URL, allowing you to change the underlying destination web page, update a PDF menu, or edit contact info at any time without reprinting physical labels.
If you print a static QR code, the raw destination data is hardcoded into the printed physical ink matrix; it cannot be edited once printed.
Are QR code stickers waterproof and suitable for outdoor use?
QR code stickers are fully waterproof when printed on durable white vinyl or synthetic BOPP substrates paired with a protective matte UV-resistant lamination film.
Using Level H error correction (which tolerates up to 30% pattern damage) ensures your stickers stay readable even if exposed to heavy rain, UV rays, dirt, or minor surface scratches on outdoor equipment and vehicles. Standard paper stickers will break down quickly outdoors and should be used strictly for dry indoor applications.
How much do QR code stickers cost to produce?
Production costs vary depending on volume, materials, and print methods:
- At-Home DIY Desktop Printing: Costs average $0.15 to $0.30 per sticker using standard consumer sheet labels on inkjet printers.
- Professional Small Runs (50–200 stickers): Custom die-cut vinyl stickers run between $0.93 and $3.00 per sticker.
- Commercial Volume Printing (1,000+ units): High-volume roll label orders drop costs significantly, often down to a few cents per sticker, depending on specialized finishes or custom shapes.
Conclusion
A well-crafted qr code sticker bridges physical customer touchpoints with digital brand experiences. By selecting high-contrast color pairings, maintaining the four-module quiet zone, setting your dimensions to at least 2 cm × 2 cm, and picking durable matte vinyl materials, you ensure every code scans effortlessly.
At Swift Printing in Grand Rapids, Michigan, we bring decades of technical printing expertise to every project. As one of only two certified B Corporations in commercial printing worldwide, we balance premium craftsmanship with sustainable material choices. Whether you need custom packaging seals, window decals, or roll labels, our team ensures your graphics render perfectly and scan every time.
Ready to incorporate high-performing scannable codes into your physical marketing campaign? Discover expert strategies on how to maximize print marketing with QR codes, or reach out to our team today to bring your custom sticker project to life!
Hello, World!