A – Z Guide to Booklet Printing Services & Options
Booklet Printing: From PDF Pages to a Finished Booklet

Booklet printing turns a multi-page PDF into sheets that are printed in a special order, folded in half, and often stapled along the fold. For a simple desktop booklet, choose Booklet in Adobe Acrobat's Print dialog, select double-sided printing if your printer supports it, and use left binding for most US documents. Acrobat places the pages so they read in the right order after folding.
A folded sheet creates four booklet pages: two on the front and two on the back. That means your total page count should usually be a multiple of four. If you are printing at home or in the office, automatic duplex printing is the easiest route. A single-sided printer can still work: print the front sides first, reload the sheets according to your printer's feed direction, then print the back sides.
For business brochures, event programs, training guides, and nonprofit reports, the details matter. Paper choice, page count, binding, trimming, and delivery deadline all affect the final result. This guide covers both Acrobat's basic booklet settings and the commercial options that help a larger booklet look clean and hold up well.
I am Jessica Gutowski-Slaydon, president of Swift Printing and a third-generation print professional in Grand Rapids, Michigan. My work in booklet printing includes helping local organizations and businesses turn digital files into reliable, well-finished printed pieces.
Understanding Booklet Printing and Digital Imposition
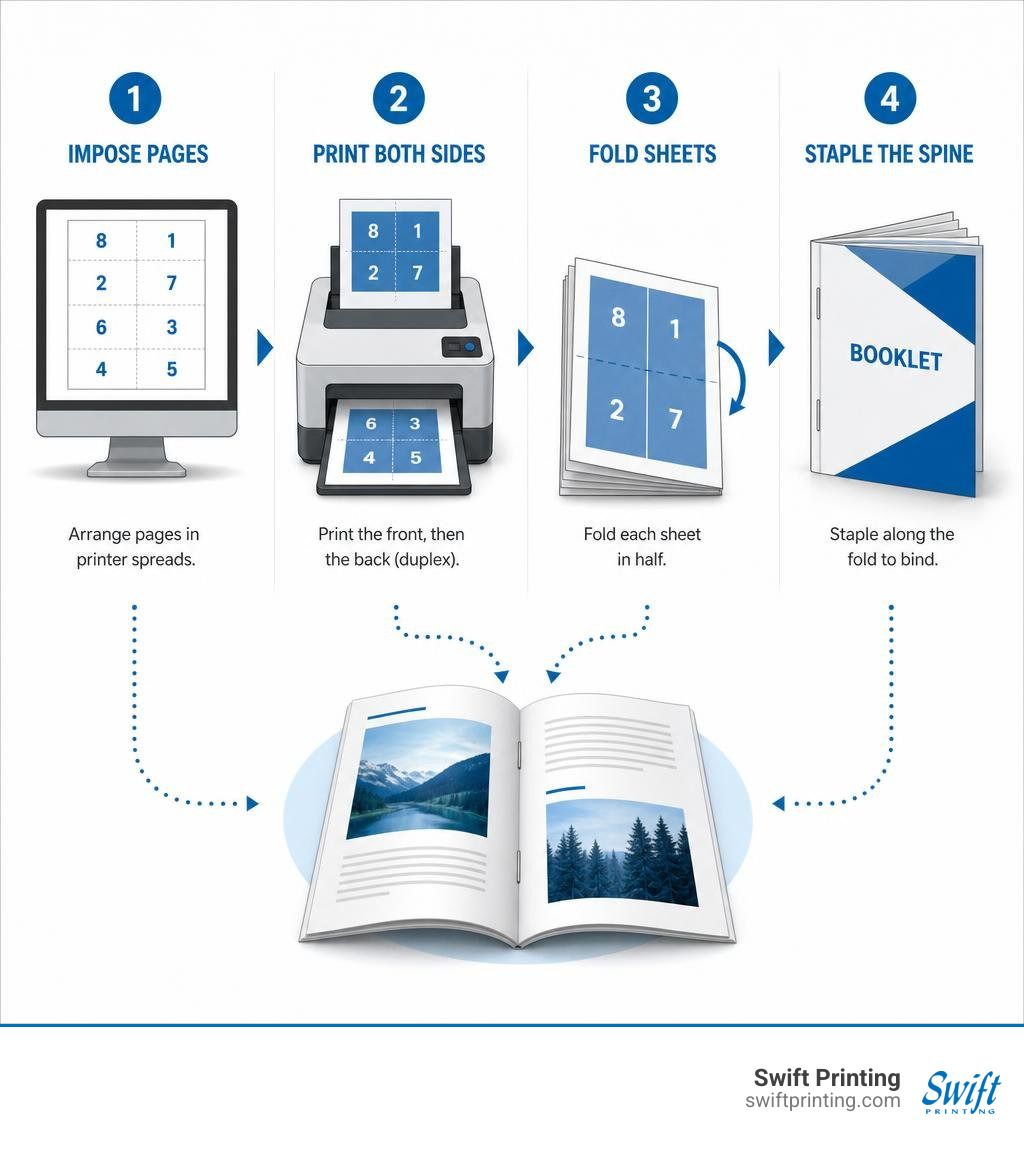
When you read a catalog or annual report, you view pages sequentially: page 1, then page 2, then page 3. In the design world, we call this sequential view "reader spreads." However, if you pull out the center staple of an 8-page booklet, you will discover that page 1 does not share a physical sheet of paper with page 2. Instead, page 1 is printed side-by-side with page 8 on the outside front and back covers, while page 2 is printed directly on the reverse side next to page 7.
This rearrangement of pages onto physical sheets so they read in sequential order once folded and bound is called page imposition. Digital imposition arranges your source PDF into "printer spreads." When imposition is executed properly, sheet geometry and duplex registration align down to fractions of a millimeter.
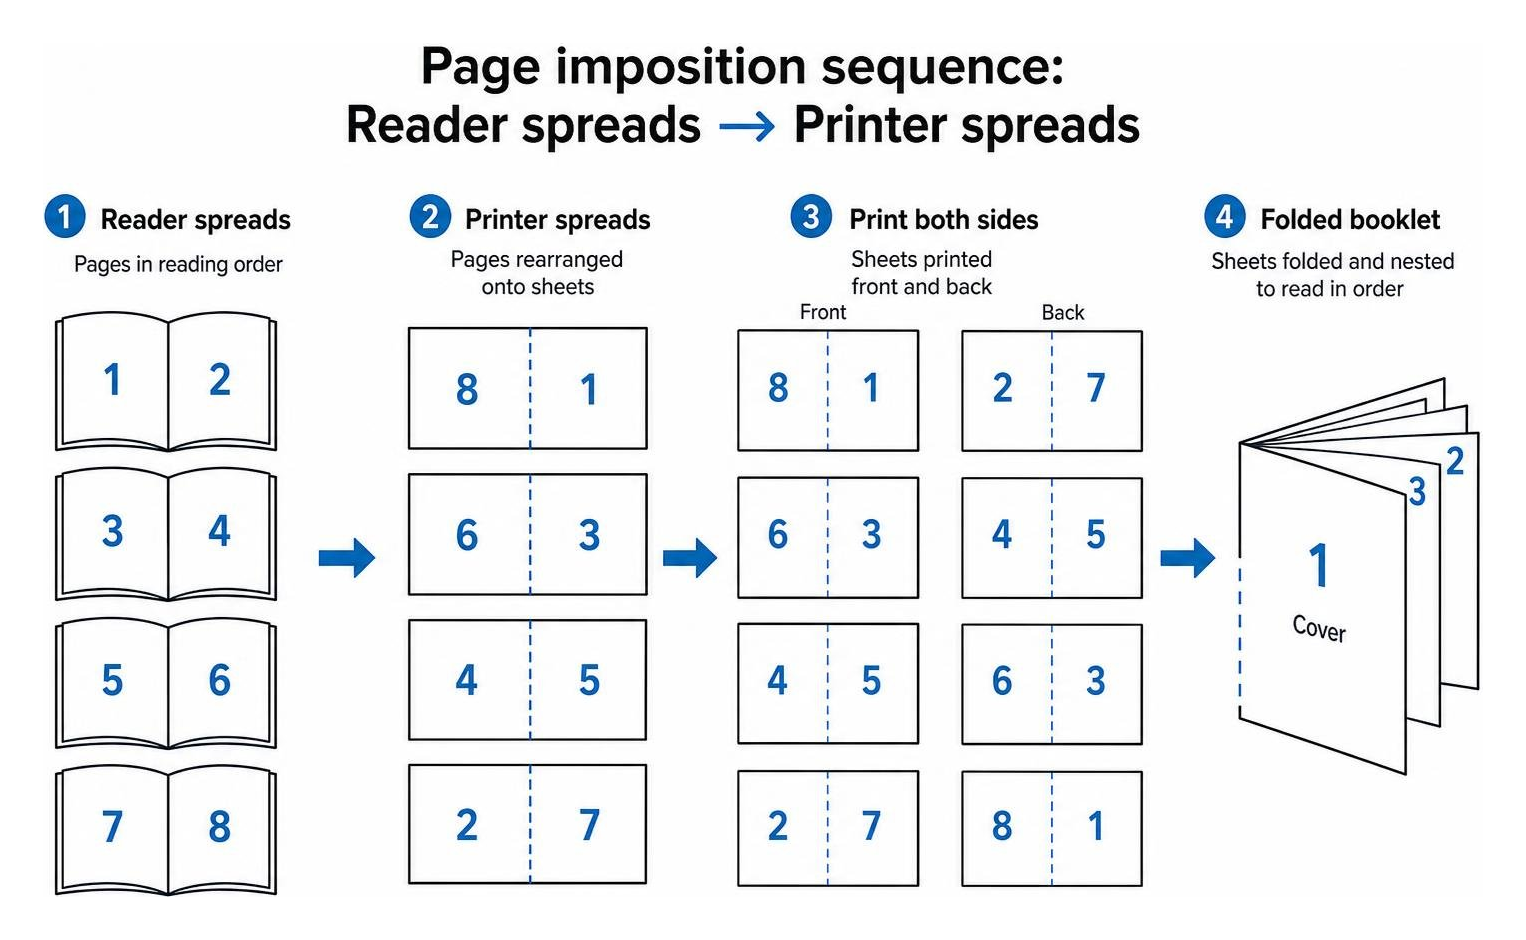
In professional digital prepress workflows, imposition is handled automatically by sophisticated RIP (Raster Image Processor) software. When you are preparing files at your desk, skipping proper prepress checks is one of The 10 Most Common Print File Mistakes and How to Avoid Them. If you submit single pages that do not account for sheet folding, or if you attempt to impose pages manually by copying and pasting artwork onto horizontal sheets, you risk misaligning margins, flipping page orders, and generating costly reprints.
How Adobe Acrobat Manages Booklet Printing
For desktop jobs, Adobe Acrobat includes a built-in imposition engine that simplifies this layout process. You do not need expensive layout software just to turn a simple 12-page PDF into a folded program.
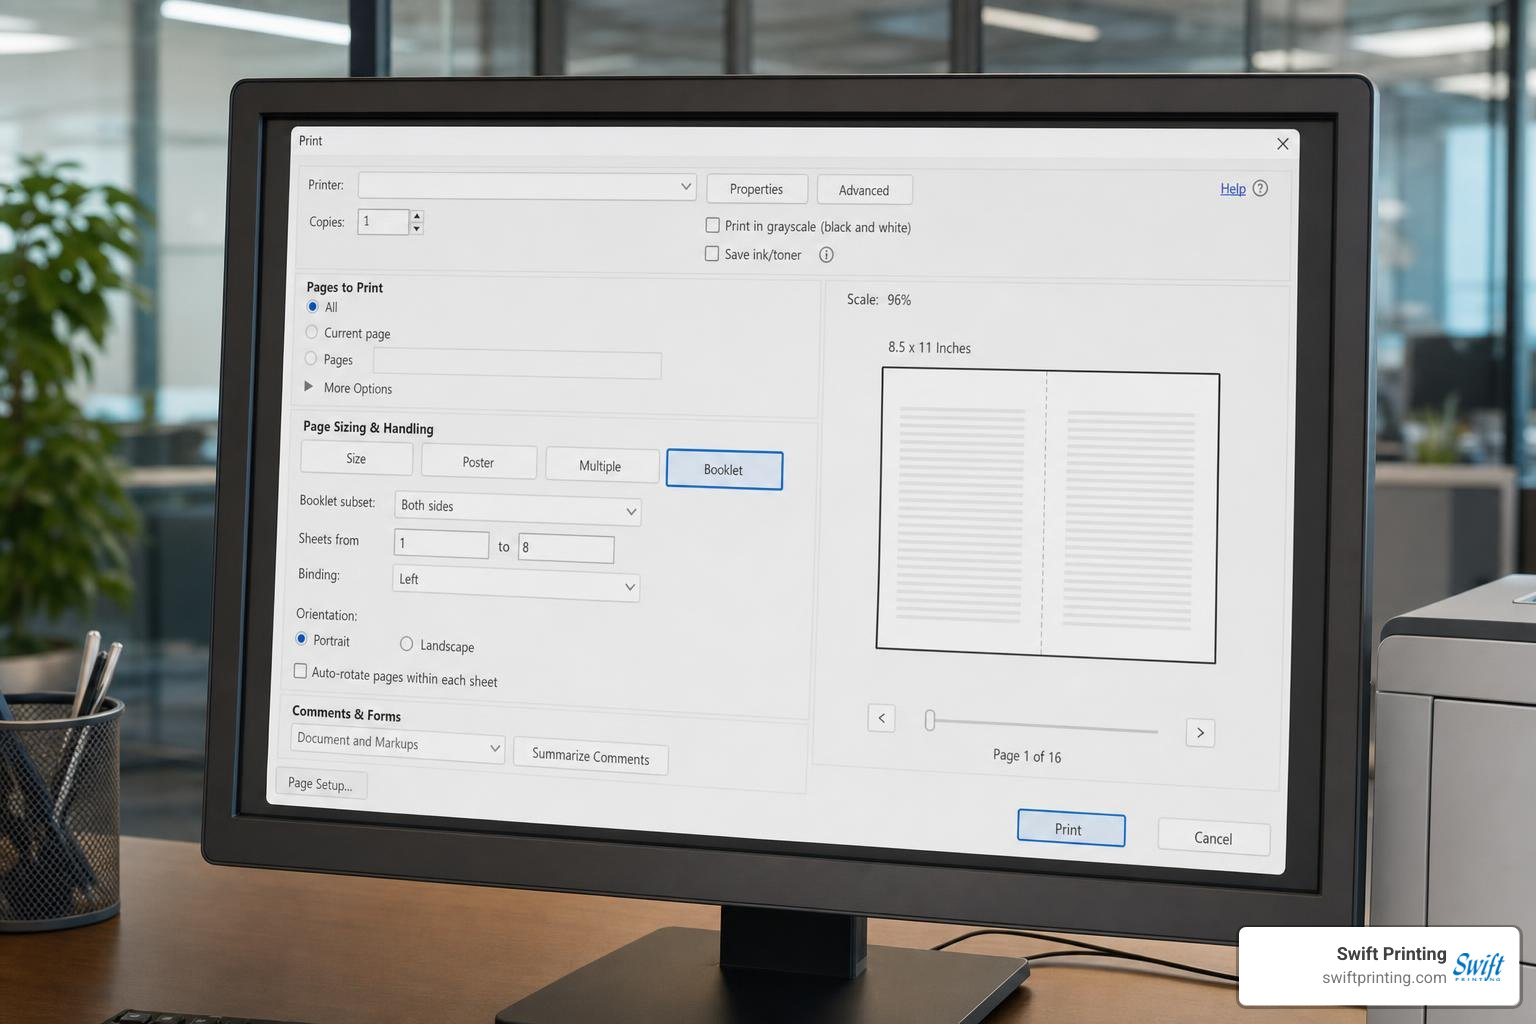
When you open a PDF in Adobe Acrobat and navigate to the Print dialog box, selecting Booklet under the Page Sizing & Handling section activates Acrobat’s automatic imposition algorithm. Acrobat recalculates your page sequence on the fly. It groups the first and last pages onto the first sheet, scales the page content proportionally to fit two pages across your selected paper size, and ensures that the reverse side receives the corresponding interior pages.
Acrobat also manages sheet scaling. If your digital artboard is formatted to standard US Letter dimensions ($8.5 \times 11$ inches) and you print onto standard Letter paper, Acrobat scales each page down by roughly 50% so two $5.5 \times 8.5$-inch pages sit comfortably side by side on one landscape sheet.
Essential Prerequisites: Printer Hardware and Page Multiples
Before sending a booklet job to your printer, ensure your physical hardware and digital files meet several mechanical prerequisites:
- Duplex Hardware: An automatic duplex unit inside your printer flips the paper internally to print both sides in a single workflow. If your printer lacks this hardware, you will need to perform a manual two-pass print run.
- Paper Tray Support: Your printer tray must support the flat, unfolded sheet size. To make a standard $5.5 \times 8.5$-inch finished booklet, you need standard $8.5 \times 11$-inch Letter paper. To produce a full-size $8.5 \times 11$-inch finished booklet, your printer must support $11 \times 17$-inch (Tabloid/Ledger) paper.
- Four-Page Multiples: Every single sheet of paper folded in half creates exactly four physical booklet pages (two on the front, two on the back). Your document’s total page count must be a multiple of 4 (e.g., 8, 12, 16, 20, 24, 28, or 32 pages). If your PDF contains 10 pages, Acrobat will insert blank pages at the end to make the math work, which might leave you with an awkward blank back cover.
- Proper Bleed Margins: If your artwork extends to the very edge of the page, desktop printers will introduce a white border because they cannot print edge-to-edge. Understanding Why Crop and Bleed Marks Matter in Printing a Guide From a Grand Rapids Print Shop ensures your text does not get clipped during trimming.
Step-by-Step Guide to Configuring Print Settings
Configuring Acrobat's print menu correctly prevents wasted paper and toner. Follow these steps in Adobe Acrobat or Acrobat Reader:
- Open the Print Window: Open your PDF file, click
File>Print, or pressCtrl + P(Windows) /Cmd + P(Mac). - Select Your Printer: Choose your targeted office or desktop printer from the top dropdown menu.
- Define Page Range: Under Pages to Print, select All to produce the entire document, or enter a specific page range. Ensure your range includes a multiple of 4 pages.
- Engage Booklet Mode: In the Page Sizing & Handling pane, click the Booklet button.
- Set Paper Properties: Click
Page Setup...in the lower left corner and confirm your paper size matches your flat sheet size (e.g., Letter for half-size booklets, Tabloid for full-size booklets). Learn more about sheet dimensions and weights in Swifts Official Guide to Paper.
| Configuration Feature | Automatic Duplex Printing | Manual Two-Pass Printing |
|---|---|---|
| Printer Requirement | Built-in duplex reversing unit | Standard single-sided printer |
| Booklet Subset Setting | Both sides | Front side only, then Back side only |
| User Intervention | None (set and forget) | High (manually flip and reinsert sheets) |
| Risk of Jam/Misfeed | Low to moderate | High (static and sheet curl) |
| Best For | Routine office guides, quick proofs | Legacy home printers, low-volume tests |
Setting Booklet Subsets for Duplex and Single-Sided Output
Within the Booklet settings panel, the Booklet subset dropdown menu controls which side of the sheet prints during each pass:
- Both sides: Use this option if your printer has an automatic duplexer. Acrobat instructs the printer to image the front spreads, pull the sheet back into the internal reversing unit, image the reverse spreads, and deliver a fully imposed, double-sided sheet to the exit tray.
- Front side only: Use this as step one for manual single-sided printing. Acrobat prints only the odd-numbered printer spreads (all the outer sides of your folded sheets).
- Back side only: Use this as step two for manual printing. After printing the front sides, you reload those printed sheets into your paper tray and run this pass to print the interior facing pages on the reverse side.
Adjusting Binding Orientation and Auto-Rotate Controls
Under the Booklet settings, you will find options for binding placement and page orientation:
- Binding Dropdown:
- Left: Standard reading orientation in the United States and Western markets (spine on the left, reading left to right).
- Right: Used for international languages that read right to left (such as Hebrew or Arabic) or specialty vertical Japanese formats.
- Left (Tall) / Right (Tall): Used for top-hinged calendars, flipbooks, and landscape notepads where the binding runs across the short edge.
- Auto-Rotate Pages Within Each Sheet: Always ensure this checkbox is selected. It lets Acrobat orient each PDF page automatically so that artwork matches the aspect ratio of the half-sheet without unintended cropping or clipping.
Manual Duplexing and Assembly Workflow
If your office printer only prints single-sided, you can still produce booklets using manual duplexing. However, desktop feed mechanisms require careful handling to avoid upside-down interiors or misaligned backs. When commercial-level registration is required for sales materials, Digital Printing equipment eliminates this hassle entirely by handling micro-adjustments automatically.
Executing Two-Pass Booklet Printing on Standard Desktop Printers
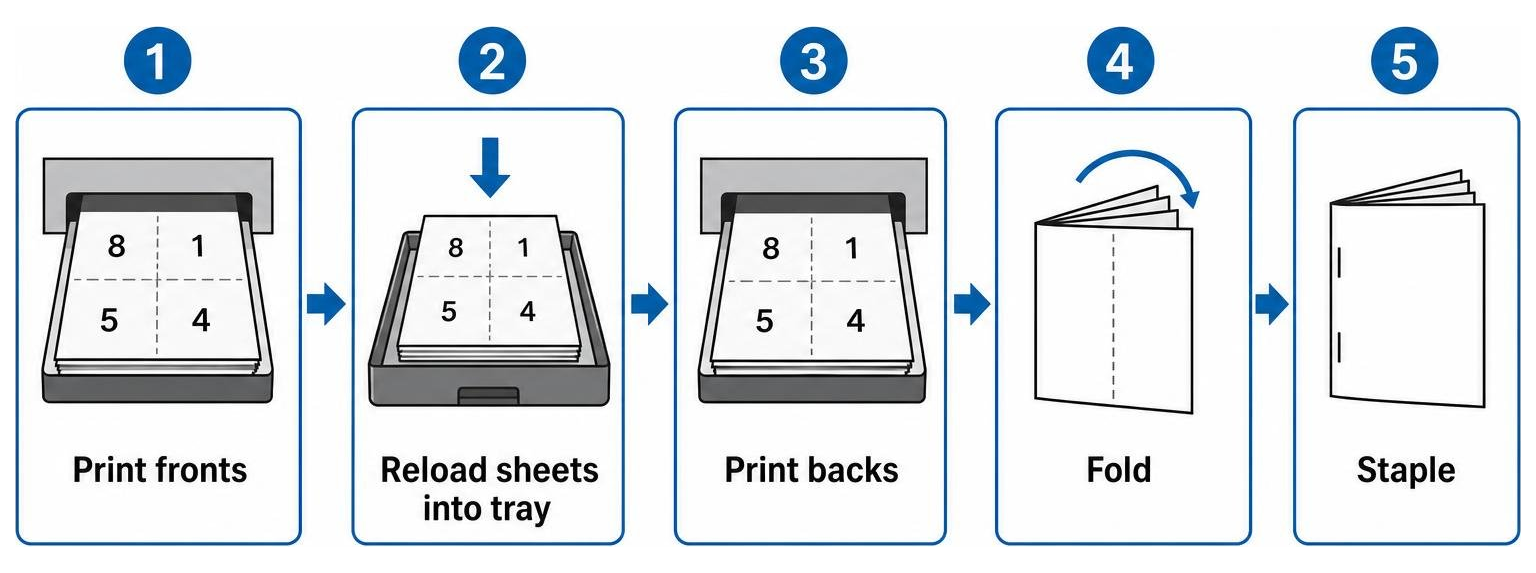
To execute a manual two-pass print run without ruining a stack of paper:
- Run a Test Sheet: Take a blank sheet of paper, write "Top - Face Up" in pencil on one side, put it in your feed tray, and print a single test page. Note how your printer pulls and flips the paper.
- Print Front Side Only: In Acrobat's Booklet menu, select Front side only under Booklet subset and click
Print. - Manage Sheet Curl and Static: Freshly printed sheets carry heat and static charge, which can cause paper jams during the second pass. Let the stack rest for 60 seconds, tap the edges flat on your desk, and gently fan the stack.
- Reload the Paper: Place the printed stack back into the input tray. For most desktop top-feed printers, you reinsert the sheets printed-face-down with the top edge pointing into the printer feed. For bottom-loading slide trays, sheets often go in printed-face-up.
- Print Back Side Only: Return to Acrobat, select Back side only under Booklet subset, and print.
Folding, Saddle Stitching, and Edge Trimming
Once your sheets are printed double-sided, gather them in sequential order:
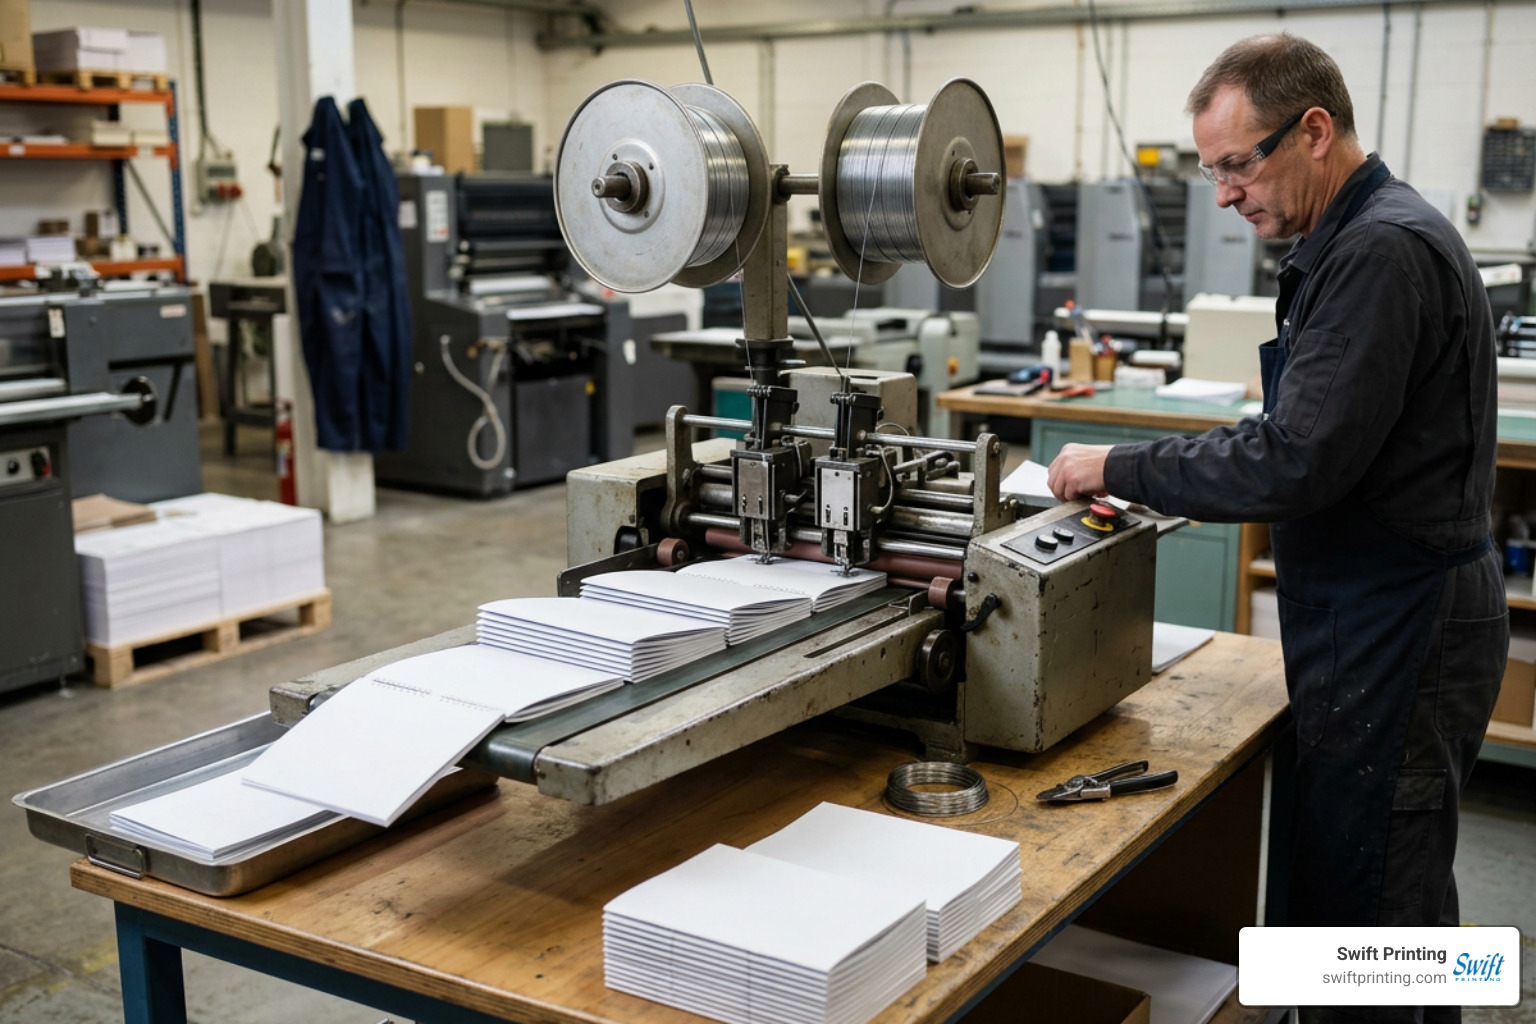
- Collate and Score: Align the edges of your sheets. If you are using heavy stock (like 80 lb or 100 lb text), score the center line using a bone folder and metal ruler. Scoring prevents the toner or paper fibers from cracking when folded.
- Saddle Stitching: Open the sheets flat, face down. Using a long-reach booklet stapler (or heavy-duty saddle stitcher), drive two staples along the center spine fold line, positioned about 1.5 to 2 inches from the top and bottom edges.
- Fold the Spine: Fold the booklet in half along the staple line, pressing firmly with a bone folder from the center spine outward toward the edges to create a tight crease.
- Face Trimming: When several sheets are nested together, the middle pages will push outward beyond the cover (a defect called "creep"). Use a sharp craft knife and a straight edge to trim this protruding edge flat. For high-volume production, commercial finishing equipment accomplishes this instantly with clean guillotine blades. Explore different binding formats in our guide to Bindery Options Here at Swift.
Commercial Finishing and Troubleshooting Common Print Defects
While desktop booklet printing is convenient for quick office drafts, professional client-facing assets—like catalogs, event programs, and shareholder reports—benefit from commercial production standards. Our Commercial Book Printing Guide 2026 outlines the heavy-duty machinery and precision calibration that separate DIY office prints from high-end corporate collateral.
Addressing Creep, Alignment, and Page Scaling Errors
Desktop booklet printing often runs into three common defects:
- Spine Creep: As sheet count grows (typically over 16 pages), the thickness of the folded paper causes the innermost spreads to push outward past the outer cover edge. If left uncorrected, trimming the face will cut off the outside margins of interior pages. Commercial prepress software adjusts for this automatically through "shingling"—incrementally shifting interior page artwork toward the spine.
- Back-to-Back Registration Drift: Office printers can experience mechanical drift of 1 to 3 mm between the front and reverse passes. In fine graphic layouts, this makes borders look off-center. Professional digital presses use optical sensors to lock duplex registration within 0.2 mm.
- Page Scaling Shrinkage: If you accidentally check Fit to Printable Area inside Acrobat alongside booklet settings, the software scales down your artwork twice, shrinking text and leaving oversized white margins. Always verify your scaling is set to 100% or Actual Size before engaging the Booklet dialogue.
Selecting Professional Bindery and Stock Upgrades
Upgrading from plain 20 lb copy paper transforms how your booklet feels in your customer's hands. At Swift Printing, we help clients choose stocks and finishes that balance aesthetic appeal, durability, and budget:
- Self-Cover vs. Plus-Cover: A self-cover booklet uses the same paper stock throughout the entire piece (e.g., 80 lb gloss text on all pages). A plus-cover (or separate cover) uses a thicker, sturdier stock for the outer four pages (such as 100 lb gloss or silk cover) while keeping interior pages lighter.
- Coating Options: Adding a protective matte, satin, or gloss aqueous coating prevents fingerprint smudges on high-ink photos and dark backgrounds.
- Specialty Finishing: For luxury annual reports or commemorative guides, you can add foil stamping, soft-touch laminates, or embossing. To learn how tactile enhancements improve engagement, read our breakdown of Finishing Options for Printing.
Frequently Asked Questions About Booklet Production
Why must a booklet's page count always be a multiple of four?
Each sheet of paper folded in half creates four separate booklet panels: two on the outer spread and two on the inner spread. Regardless of whether your document is 4, 8, 12, 16, or 64 pages, you cannot add or remove a single page without adding or removing a full physical folded sheet (four pages). If your content only covers 14 pages, your file will need two blank pages—often placed inside the covers or at the very end—to maintain proper imposition.
How do you prevent booklet creep in thick documents?
Creep is managed during the digital prepress phase using dynamic gutter compensation (shingling). Prepress software gradually shifts the artwork of interior pages inward toward the spine gutter by fractions of a millimeter per page. When the assembled booklet is stapled and the outer edge is trimmed flush with a three-knife trimmer, all page margins appear uniform and no text is clipped.
Can you print full-bleed booklets on standard office paper?
No, standard desktop and office printers cannot print completely to the edge of standard Letter or Tabloid sheets; they require a non-printable mechanical grip border (typically 0.1875 to 0.25 inches). To achieve a seamless full-bleed booklet where images and colors extend edge-to-edge, the document must be printed on oversized stock (such as $12 \times 18$-inch sheets) and trimmed down to final dimensions after folding and stitching.
Conclusion
Whether you are printing an urgent 8-page meeting agenda directly from Adobe Acrobat or planning a full-color, 32-page quarterly report, mastering booklet mechanics ensures your documents fold correctly, read smoothly, and look sharp. For everyday office needs, Acrobat's built-in Booklet tool paired with a dependable duplex printer gets the job done cleanly.
When your brand reputation is on the line, professional commercial production makes all the difference. As a Certified B Corporation based right here in Grand Rapids, Michigan, Swift Printing combines precise digital imposition, high-speed saddle stitching, and eco-friendly sustainable paper stocks to make your publications stand out. Ready to bring your next print catalog or booklet project to life? Visit Swift Printing to request a quote, review digital proofs, and collaborate with our team.